Posts

Showing posts with the label Load Balancing

Using nginx as http load balancer

Image
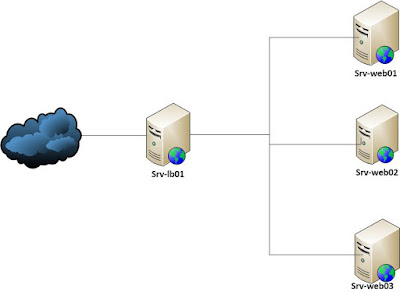
Load balancing across multiple application instances is a commonly used technique for optimizing resource utilization, maximizing throughput, reducing latency, and ensuring fault-tolerant configurations. Nginx is a very efficient HTTP load balancer to distribute traffic to several application servers and to improve performance, scalability and reliability of web applications. Nginx Load balancing methods The following load balancing mechanisms (or methods) are supported in nginx: round-robin least-connected ip-hash See detail at http://nginx.org/en/docs/http/load_balancing.html Initialization Nginx Load Banlancing In this tutorial I use any hostname and ip addresses as follows: srv-lb01 (10.11.218.250) (Nginx load balancer) srv-web01 (10.11.218.251) ( Web server) srv-web02 (10.11.218.252) ( Web server) srv-web03 (10.11.218.253) ( Web server) Note: pointing nginx.vn to 10.11.218.250 (Replace nginx.vn with your real site name) Default load balancing c...

Web Servers Load balancing with HAProxy

HAProxy is a free, very fast and reliable solution offering  high availability , load balancing , and proxying for TCP and HTTP-based applications. It is particularly suited for very high traffic web sites and powers quite a number of the world’s most visited ones. See more at  http://haproxy.org This tuturial, I use hostname and ip as follows: 10.11.218.250 (haproxy) 10.11.218.251 (srv-web01) 10.11.218.252 (srv-web02) Installing HAProxy server #yum install haproxy [RedHat Systems] #apt-get install haproxy [Debian Systems] Configuring HAProxy Server Opening the main HAProxy configuration file ‘/etc/haproxy/haproxy.cfg’ and editing the following content: #---------------------------------------------------------------- # Global settings global # need to: # to have these messages end up in /var/log/haproxy.log you will # # by adding the '-r' option to the SYSLOGD_OPTIONS in # 1) configure syslog to accept network log events. ...

MySQL Master Master Repliction

This tutorial describes how to set up MySQL master-master replication. We need to replicate MySQL servers to achieve high-availability (HA). In my case I need two masters that are synchronized with each other so that if one of them drops down, other could take over and no data is lost. Similarly when the first one goes up again, it will still be used as slave for the live one. Here  is a basic step by step tutorial, that will cover the mysql master and slave replication and also will describe the mysql master and master replication. Notions:   we will call system 1 as master1 and slave2 and system2 as master2 and slave 1. Step 1: Install mysql on master 1 and slave 1. configure network services on both system, like Master 1/Slave 2 ip: 10.11.218.251 Master 2/Slave 1 ip : 10.11.218.252  Step 2: Setup Master 1 On Master 1, make changes in my.cnf: #vim /etc/my.cnf log-bin=mysql-bin server-id=1 binlog-ignore-db=”mysql” * Restart MySQL Master Se...